SSH Access to Virtual Machines using the EIDF-Gateway Jump Host
The EIDF-Gateway is an SSH gateway suitable for accessing EIDF Services via a console or terminal. As the gateway cannot be 'landed' on, a user can only pass through it and so the destination (the VM IP) has to be known for the service to work. Users connect to their VM through the jump host using their given accounts. You will require three things to use the gateway:
- A user within a project allowed to access the gateway and a password set.
- An SSH-key linked to this account, used to authenticate against the gateway.
- Have MFA setup with your project account via SAFE.
Steps to meet all of these requirements are explained below.
Generating and Adding an SSH Key
In order to make use of the EIDF-Gateway, your EIDF account needs an SSH-Key associated with it. If you added one while creating your EIDF account, you can skip this step.
Check for an existing SSH Key
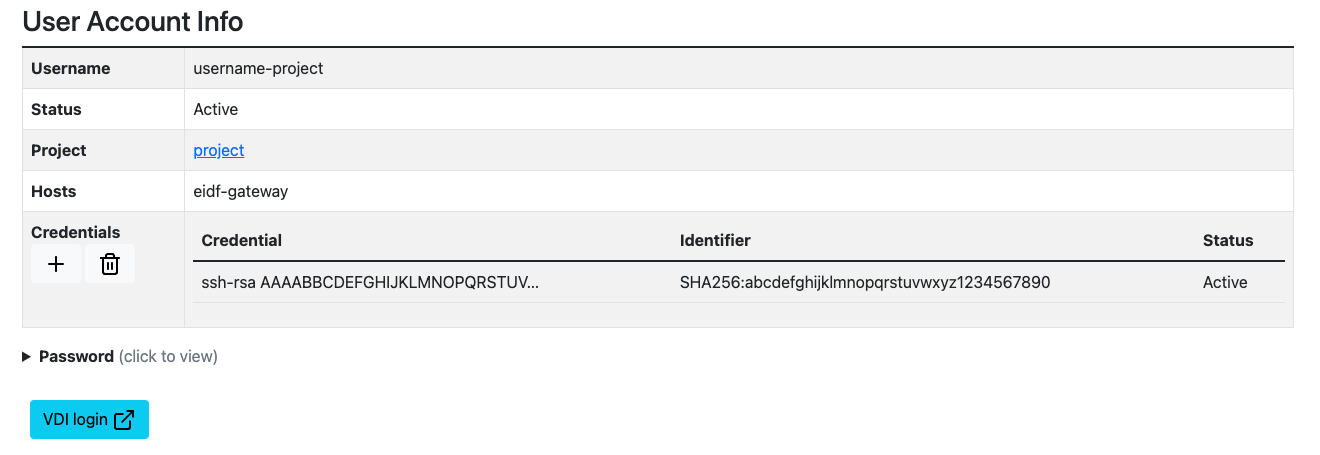
To check if you have an SSH Key associated with your account:
- Login to the Portal
- Select 'Your Projects'
- Select your project name
- Select your username
If there is an entry under 'Credentials', then you're all setup. If not, you'll need to generate an SSH-Key, to do this:
Generate a new SSH Key
- Open a new window of whatever terminal you will use to SSH to EIDF.
-
Generate a new SSH Key:
ssh-keygen -
It is fine to accept the default name and path for the key unless you manage a number of keys.
- Press enter to finish generating the key
Adding the new SSH Key to your account via the Portal
- Login into the Portal
- Select 'Your Projects'
- Select the relevant project
- Select your username
- Select the plus button under 'Credentials'
- Select 'Choose File' to upload the PUBLIC (.pub) ssh key generated in the last step, or open the
.pub file you just created and copy its contents into the text box. - Click 'Upload Credential' - it should look something like this:
Adding a new SSH Key via SAFE
This should not be necessary for most users, so only follow this process if you have an issue or have been told to by the EPCC Helpdesk. If you need to add an SSH Key directly to SAFE, you can follow this guide. However, select your '[username]@EIDF' login account, not 'Archer2' as specified in that guide.
Enabling MFA via the Portal
A multi-factor Time-Based One-Time Password is now required to access the SSH Gateway.
To enable this for your EIDF account:
- Login to the portal.
- Select 'Projects' then 'Your Projects'
- Select the project containing the account you'd like to add MFA to.
- Under 'Your Accounts', select the account you would like to add MFA to.
- Select 'Set MFA Token'
- Within your chosen MFA application, scan the QR Code or enter the key and add the token.
- Enter the code displayed in the app into the 'Verification Code' box and select 'Set Token'
- You will be redirected to the User Account page and a green 'Added MFA Token' message will confirm the token has been added successfully.
Note
TOTP is only required for the SSH Gateway, not to the VMs themselves, and not through the VDI.
An MFA token will have to be set for each account you'd like to use to access the EIDF SSH Gateway.
Using the SSH-Key and TOTP Code to access EIDF - Windows and Linux
-
From your local terminal, import the SSH Key you generated above:
ssh-add /path/to/ssh-key -
This should return "Identity added [Path to SSH Key]" if successful. You can then follow the steps below to access your VM.
Accessing From MacOS/Linux
OpenSSH is installed on Linux and MacOS usually by default, so you can access the gateway natively from the terminal.
Ensure you have created and added an ssh key as specified in the 'Generating and Adding an SSH Key' section above, then run the commands below:
ssh-add /path/to/ssh-key
ssh -J [username]@eidf-gateway.epcc.ed.ac.uk [username]@[vm_ip]
For example:
ssh-add ~/.ssh/keys/id_ed25519
ssh -J alice@eidf-gateway.epcc.ed.ac.uk alice@10.24.1.1
Info
If the ssh-add command fails saying the SSH Agent is not running, run the below command:
eval `ssh-agent`
Then re-run the ssh-add command above.
The -J flag is use to specify that we will access the second specified host by jumping through the first specified host.
You will be prompted for a 'TOTP' code upon successful public key authentication to the gateway. At the TOTP prompt, enter the code displayed in your MFA Application.
Accessing from Windows
Windows will require the installation of OpenSSH-Server to use SSH. Putty or MobaXTerm can also be used but won’t be covered in this tutorial.
Installing and using OpenSSH
- Click the ‘Start’ button at the bottom of the screen
- Click the ‘Settings’ cog icon
- Select 'System'
- Select the ‘Optional Features’ option at the bottom of the list
- If ‘OpenSSH Client’ is not under ‘Installed Features’, click the ‘View Features’ button
- Search ‘OpenSSH Client’
- Select the check box next to ‘OpenSSH Client’ and click ‘Install’
Accessing EIDF via a Terminal
- Open either Powershell or the Windows Terminal
-
Import the SSH Key you generated above:
ssh-add \path\to\sshkey For Example: ssh-add .\.ssh\id_ed25519 -
This should return "Identity added [Path to SSH Key]" if successful. If it doesn't, run the following in Powershell:
Get-Service -Name ssh-agent | Set-Service -StartupType Manual Start-Service ssh-agent ssh-add \path\to\sshkey -
Login by jumping through the gateway.
ssh -J [EIDF username]@eidf-gateway.epcc.ed.ac.uk [EIDF username]@[vm_ip]

For Example:
ssh -J alice@eidf-gateway.epcc.ed.ac.uk alice@10.24.1.1
You will be prompted for a 'TOTP' code upon successful public key authentication to the gateway. At the TOTP prompt, enter the code displayed in your MFA Application.
SSH Aliases
You can use SSH Aliases to access your VMs with a single command.
-
Create a new entry for the EIDF-Gateway in your ~/.ssh/config file. Using the text editor of your choice (vi used as an example), edit the .ssh/config file:
vi ~/.ssh/config -
Insert the following lines:
Host eidf-gateway
  Hostname eidf-gateway.epcc.ed.ac.uk
  User <eidf project username>
  IdentityFile /path/to/ssh/key
For example:
Host eidf-gateway Hostname eidf-gateway.epcc.ed.ac.uk User alice IdentityFile ~/.ssh/id_ed25519 -
Save and quit the file.
-
Now you can ssh to your VM using the below command:
ssh -J eidf-gateway [EIDF username]@[vm_ip] -i /path/to/ssh/keyFor Example:
ssh -J eidf-gateway alice@10.24.1.1 -i ~/.ssh/id_ed25519 -
You can add further alias options to make accessing your VM quicker. For example, if you use the below template to create an entry below the EIDF-Gateway entry in ~/.ssh/config, you can use the alias name to automatically jump through the EIDF-Gateway and onto your VM:
Host <vm name/alias>
  HostName 10.24.VM.IP
  User <vm username>
  IdentityFile /path/to/ssh/key
  ProxyCommand ssh eidf-gateway -W %h:%p
For Example:
Host demo HostName 10.24.1.1 User alice IdentityFile ~/.ssh/id_ed25519 ProxyCommand ssh eidf-gateway -W %h:%p -
Now, by running
ssh demoyour ssh agent will automatically follow the 'ProxyCommand' section in the 'demo' alias and jump through the gateway before following its own instructions to reach your VM.
Note for this setup, if your key is RSA, you will need to add the following line to the bottom of the 'demo' alias:HostKeyAlgorithms +ssh-rsa
Info
This has added an 'Alias' entry to your ssh config, so whenever you ssh to 'eidf-gateway' your ssh agent will automatically fill the hostname, your username and ssh key.
This method allows for a much less complicated ssh command to reach your VMs.
You can replace the alias name with whatever you like, just change the 'Host' line from saying 'eidf-gateway' to the alias you would like.
The -J flag is use to specify that we will access the second specified host by jumping through the first specified host.
sudo, Password Setting and Password Resets
You do not have to set a password to log into virtual machines. However, if you have been given sudo permission, you will need to set a password to be able to make use of sudo. You can set (or reset) a password using the web form in the EIDF Portal following the instructions in Set or change the password for a user account.