An introduction to LAMMPS on ARCHER2
Overview
Teaching: 30 min
Exercises: 20 minQuestions
What is LAMMPS?
How do I run jobs in ARCHER2?
Objectives
Understand what LAMMPS is.
Learn how to launch jobs on ARCHER2 using the slurm batch system.
Run a LAMMPS benchmark exercise to see how benchmarking can help improve code performance.
ARCHER2 system overview
Architecture
The ARCHER2 HPE Cray EX system consists of a number of different node types. The ones visible to users are:
- Login nodes
- Compute nodes
- Data analysis (pre-/post- processing) nodes
All of the non-GPU node types have the same processors: AMD EPYCTM 7742, 2.25GHz, 64-cores. All non-GPU nodes are dual socket nodes so there are 128 cores per node.
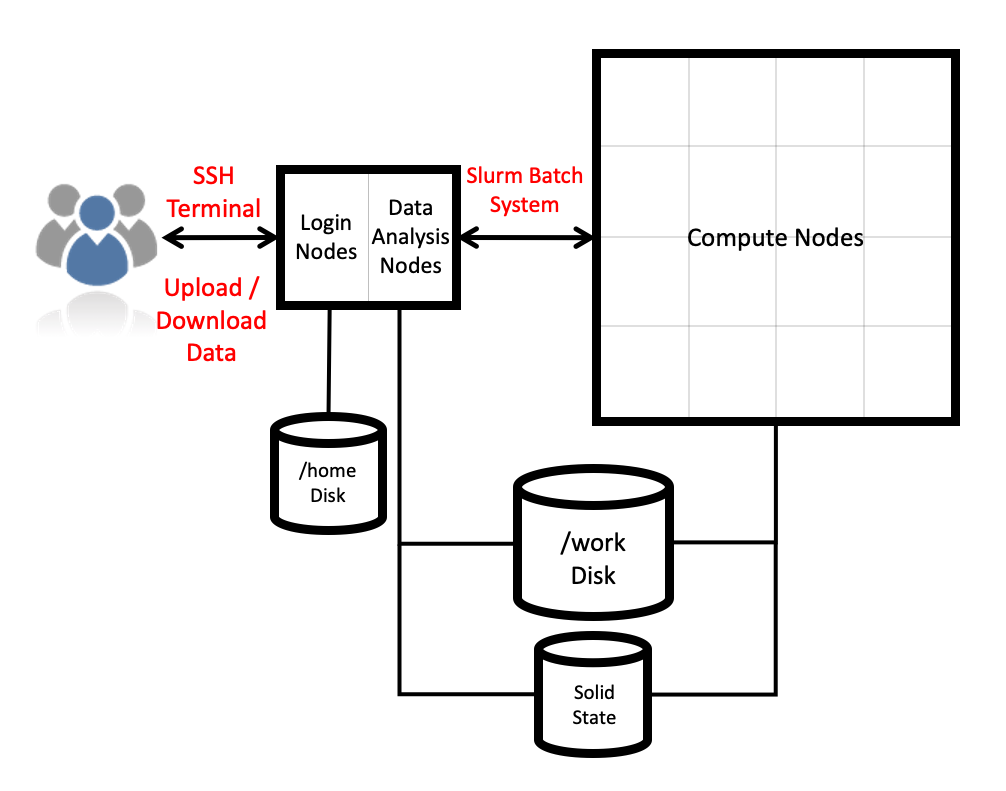
Compute nodes
There are 5,860 CPU compute nodes in total, giving 750,080 compute cores on the full ARCHER2 system. There are also 4 GPU nodes for software development. Most of these (5,276 nodes) have 256 GiB memory per node, a smaller number (584 nodes) have 512 GiB memory per node. All of the compute nodes are linked together using the high-performance HPE Slingshot interconnect.
Access to the compute nodes is controlled by the Slurm scheduling system which supports both batch jobs and interactive jobs.
Compute node summary:
| CPU Nodes | GPU Nodes | |
|---|---|---|
| Processors | 2x AMD EPYC Zen2 (Rome) 7742, 2.25 GHz, 64-core | 1x AMD EPYC Zen3 7543P (Milan), 2.8GHz, 32-core |
| Cores per node | 128 | 32 |
| NUMA | 8 NUMA regions per node, 16 cores per NUMA region | 4 NUMA regions, 8 cores per NUMA region |
| Memory Capacity | 256/512 GiB DDR4 3200MHz, 8 memory channels | 512 GiB DDR4 3200MHz, 8 memory channels |
| Memory Bandwidth | >380 GB/s per node | 40 GB/s (Host-Device), 80GB/s (Device-Device) |
| Interconnect Bandwidth | 25 GB/s per node bi-directional | 25 GB/s per node bi-directional |
| Accelerators | None | 4x AMD Instinct MI210, 104 compute units, 64GiB HBM2e memory |
Storage
There are four different storage systems available on the current ARCHER2 service:
- Home file systems:
/home - Work file systems:
/work - Solid-state file system (scratch):
/scratch-nvme - RDF as a Service (RDFaaS):
/epsrc
What is LAMMPS?
LAMMPS (Large-scale Atomic/Molecular Massively Parallel Simulator) is a versatile classical molecular dynamics software package. It is developed by Sandia National Laboratories and by its wide user-base.
It can be downloaded from https://lammps.sandia.gov/download.html
Everything we are covering today (and a lot of other info) can be found in the LAMMPS User Manual
Using a LAMMPS module on ARCHER2
ARCHER2 uses a module system.
In general, you can run LAMMPS on ARCHER2 by using the LAMMPS module.
You can use the module spider command to list all available versions of a module, and their dependencies:
user@ln01:~> module spider lammps
-------------------------------------------------------------------------------
  lammps:
-------------------------------------------------------------------------------
     Versions:
        lammps/2Aug2024-GPU
        lammps/13Feb2024
        lammps/15Dec2023
        lammps/17Feb2023
     Other possible modules matches:
        cpl-lammps  cpl-openfoam-lammps  lammps-gpu  lammps-python

-------------------------------------------------------------------------------
  To find other possible module matches execute:

      $ module -r spider '.*lammps.*'

-------------------------------------------------------------------------------
  For detailed information about a specific "lammps" package (including how to
  load the modules) use the module full name. Note that names that have a
  trailing (E) are extensions provided by other modules.
  For example:

     $ module spider lammps/17Feb2023
-------------------------------------------------------------------------------
Running module load lammps will set up your environment to use the default LAMMPS module on ARCHER2.
For this course, we will be using the 17 February, 2023 version of LAMMPS (which is the default):
module load lammps
Once your environment is set up, you will have access to the lmp LAMMPS executable.
Note that you will only be able to run this on a single core on the ARCHER2 login node.
Running LAMMPS on ARCHER2 compute nodes
We will now launch a first LAMMPS job from the compute nodes. The login nodes are shared resources on which we have limited the amount of cores that can be used for a job. To run LAMMPS simulations on a large number of cores, we must use the compute nodes.
The /home file system is not accessible from the compute nodes.
As such, we will need to submit our jobs from the /work directory.
Every user has a directory in /work associated to their project code.
For this course, the project code is ta181, so we all have a directory called:
/work/ta181/ta181/<username> (make sure to replace username with your username).
We have prepared a number of exercises for today. You can either download these by either:
Using git
git clone https://github.com/EPCCed/archer2-intro-to-lammps.git
and then navigating to the exercises folder with:
cd archer2-intro-to-lammps/exercises
Copy from /work/ta181/shared
or by copying it from the shared part of the ta181 project directory:
cp -r /work/ta181/shared/exercises ./
Exercise 1
For this session, we’ll be looking at exercises/1-performance-exercise/.
In this directory you will find three files:
sub.slurmis a Slurm submission script. This will let you submit jobs to the compute nodes. As written, it will run a single-core job but we will be editing it to run on more cores.in.ethanolis the LAMMPS input script that we will be using for this exercise. This script will run a small simulation of 125 ethanol molecules.data.ethanolis a LAMMPS data file for a single ethanol molecule. This single molecule will be replicated by LAMMPS to generate the system inside the simulation box.
Why ethanol?
The
in.ethanolLAMMPS input that we are using for this exercise is an easily edited benchmark script used within EPCC to test system performance. The intention of this script is to be easy to edit and alter when running on varied core/node counts. By editing theX_LENGTH,Y_LENGTH, andZ_LENGTHvariables, you can increase the box size substantially. As to the choice of molecule, we wanted something small and with partial charges – ethanol seemed to fit both of those.
You can submit your first job on ARCHER2 by running:
sbatch sub.slurm
You can check the progress of your job by running squeue --me.
Your job state will go from PD (pending) to R (running) to CG (cancelling).
Once your job is complete, it will have produced a file called slurm-####.out, which contains the standard output and standard error produced by your job.
A brief overview of the LAMMPS log file
The job will also produce a LAMMPS log file log.64_cpus.
The name of the file will change when the number of tasks requested in slurm are changed in the sub.slurm file.
In this file, you will find all of the thermodynamic outputs that were specified in the LAMMPS thermo_style, as well as some very useful performance information!
We will explore the LAMMPS log file in more details later but, for now, we will concentrate on the LAMMPS performance information output at the end of the log file.
This will help us to understand what our simulation is doing, and where we can speed it up.
Running:
tail -n 28 log.64_cpus
will output the following:
Performance: 12.825 ns/day, 1.871 hours/ns, 148.442 timesteps/s
100.0% CPU use with 64 MPI tasks x 1 OpenMP threads

MPI task timing breakdown:
Section |  min time  |  avg time  |  max time  |%varavg| %total
---------------------------------------------------------------
Pair    | 0.00020468 | 0.30021    | 2.1814     | 117.6 |  4.44
Bond    | 0.00014519 | 0.044983   | 0.2835     |  39.4 |  0.67
Kspace  | 0.43959    | 2.4307     | 2.7524     |  43.8 | 35.98
Neigh   | 3.608      | 3.6659     | 3.7229     |   1.9 | 54.27
Comm    | 0.091376   | 0.26108    | 0.34751    |  12.6 |  3.87
Output  | 0.0028102  | 0.0029118  | 0.003015   |   0.1 |  0.04
Modify  | 0.011717   | 0.045059   | 0.19911    |  23.7 |  0.67
Other   |            | 0.004113   |            |       |  0.06

Nlocal:        102.516 ave         650 max           0 min
Histogram: 44 12 0 0 0 0 0 1 1 6
Nghost:        922.078 ave        2505 max         171 min
Histogram: 8 24 0 7 17 0 0 0 2 6
Neighs:        18165.4 ave      136714 max           0 min
Histogram: 54 2 0 0 0 0 0 1 2 5

Total # of neighbors = 1162584
Ave neighs/atom = 177.19616
Ave special neighs/atom = 7.3333333
Neighbor list builds = 1000
Dangerous builds not checked
Total wall time: 0:00:13
The ultimate aim is always to get your simulation to run in a sensible amount of time. This often simply means trying to optimise the final value (“Total wall time”), though some people care more about optimising efficiency (wall time multiplied by core count).
Increasing computational resources
The first approach that most people take to increase the speed of their simulations is to increase the computational resources. If your system can accommodate this, doing this can sometimes lead to “easy” improvements. However, this usually comes at an increased cost (if running on a system for which compute is charged) and does not always lead to the desired results.
In your first run, LAMMPS was run on 64 cores.
For a large enough system, increasing the number of cores used should reduce the total run time.
In your sub.slurm file, you can edit the number of tasks in the line:
#SBATCH --tasks-per-node=64
to run on a different number of cores. An ARCHER2 node has 128 cores, so you can run LAMMPS on up to 128 cores.
Quick benchmark
As a first exercise, fill in the table below.
Number of cores Wall time Performance (ns/day) 1 2 4 8 16 32 64 128 Do you spot anything unusual in these run times? If so, can you explain this strange result?
Solution
The simulation takes almost the same amount of time when running on a single core as when running on two cores. A more detailed look into the
in.ethanolfile will reveal that this is because the simulation box is not uniformly packed. We won’t go into all the details in this course, but we do cover most of the available optimisations in the advanced course.
Note
Here we are only considering MPI parallelisation. LAMMPS offers the option to run using joint MPI+OpenMP (more on that on the advanced LAMMPS course), but for the exercises in this lesson, we will only be considering MPI.
Key Points
LAMMPS is a versatile software used in a wide range of subjects to run classical molecular dynamics simulations.
Running jobs on ARCHER2 requires a submission to the Slurm batch system using specific account, budget, queue, and qos keywords.
Adding more cores is not always the most effective way of increasing performance.