Overview of the ARCHER2 system
Overview
Teaching: 30 min
Exercises: 15 minQuestions
How do I connect to ARCHER2?
What hardware and software is available on ARCHER2?
How does the hardware fit together?
Objectives
Gain an overview of the technology available on the ARCHER2 service.
Architecture
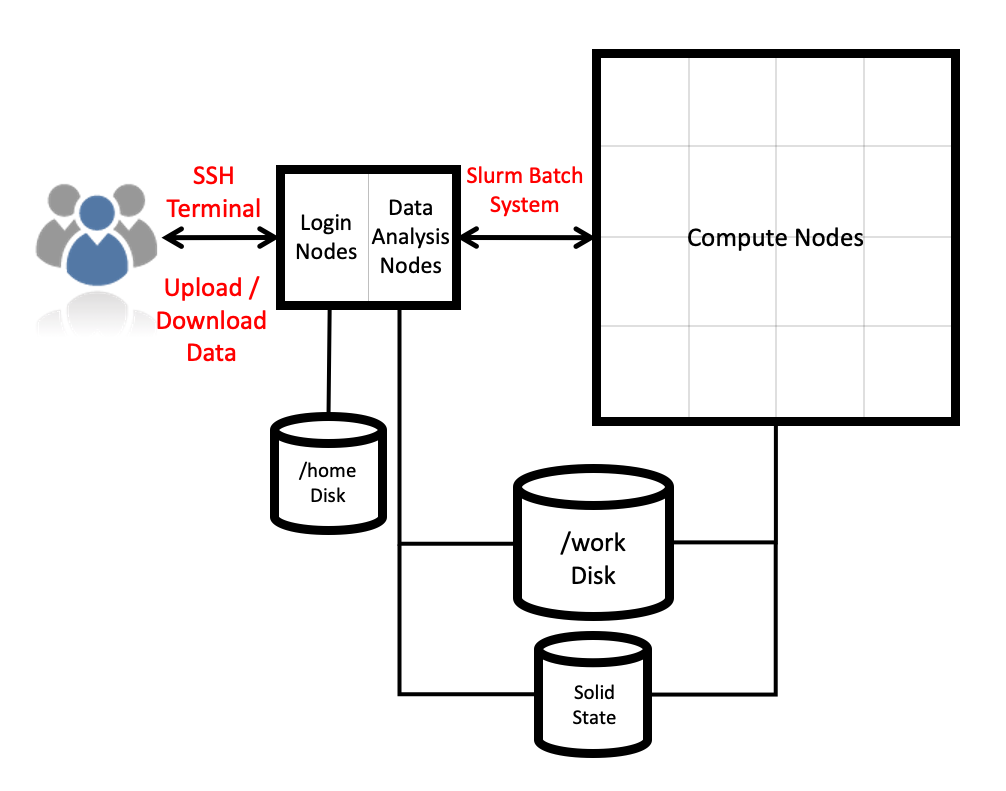
ARCHER2 is the UK’s National Supercomputing Service. The machine itself is an HPE Cray EX system consisting of a number of different node types. The ones visible to users are:
- Login nodes
- Compute nodes
- Data analysis (pre-/post- processing) nodes
All of the node types have the same processors: AMD EPYCTM Zen2 7742, 2.25GHz, 64-cores. All nodes are dual socket nodes so there are 128 cores per node.
Connecting using SSH
The login address for the full 23-cabinet ARCHER2 system is
login.archer2.ac.uk
Access to ARCHER2 is via SSH using both a password and a passphrase-protected SSH key pair.
Passwords and password policy
When you first get an ARCHER2 account, you will get a single-use password from the SAFE which you will be asked to change to a password of your choice. Your chosen password must have the required complexity as specified in the ARCHER2 Password Policy.
The password policy has been chosen to allow users to use both complex, shorter passwords and
long, but comparatively simple passwords. For example, passwords in the style of both
LA10!£lsty and horsebatterystaple would be supported.
Picking a good password
Which of these passwords would be a good, valid choice according to the ARCHER2 Password Policy?
mypasswordrainbowllamajumpingA!94ufskl$?horsebatterystapleSolution
- No This would not be accepted or a good choice as it is too short and is made up of obvious words
- Yes This would be a good choice as it is long enough and easy to remember
- Yes This would be accepted but may be difficult to remember and type (though you could use a password manager to store it)
- No While this meets the criteria, it is a well known example from a popular web comic and so would not be accepted
SSH keys
As well as password access, users are required to add the public part of an SSH key pair to access ARCHER2. The public part of the key pair is associated with your account using the SAFE web interface. See the ARCHER2 User and Best Practice Guide for information on how to create SSH key pairs and associate them with your account:
Data transfer services: scp, rsync, Globus Online
ARCHER2 supports several data transfer mechanisms. The one you choose depends on the amount and structure of the data you want to transfer and where you want to transfer the data to. The two main options are:
scp: The standard way to transfer small to medium amounts of data (in the order of MBs or GBs) off ARCHER2 to any other locationrsync: Used if you need to keep small to medium datasets (in the order of MBs or GBs) synchronised between two different locations
If you are using MobaXterm on Windows you will be able to move data using the GUI. Under the hood, this uses the same protocols.
Finally, if you have access to a storage facility with GriFTP enabled, you may also wish to use this to move data quickly to and from ARCHER2.
More information on data transfer mechanisms can be found in the ARCHER2 User and Best Practice Guide:
Compute nodes
There are 5,860 compute nodes in total giving 748,544 compute cores on ARCHER2. There are 5,276 standard compute nodes with 256 GiB memory per node and 584 high memory compute nodes with 512 GiB of memory per node. All of the compute nodes are linked together using the high-performance Cray Slingshot interconnect.
Access to the compute nodes is controlled by the Slurm scheduling system which supports both batch jobs and interactive jobs.
Compute node summary (with comparison to ARCHER):
| ARCHER2 | ARCHER | |
|---|---|---|
| Processors | 2x AMD EPYC Zen2 (Rome) 7742, 2.25 GHz, 64-core | 2x Intel E5-2697 v2, 2.7 GHz, 12-core |
| Cores per node | 128 | 24 |
| NUMA | 8 NUMA regions per node, 16 cores per NUMA region | 2 NUMA regions per node, 12 cores per NUMA region |
| Memory Capacity | 256/512 GB DDR 3200, 8 memory channels | 64/128 GB DDR 1666, 4 memory channels |
| Memory Bandwidth | >380 GB/s per node | >119 GB/s per node |
| Interconnect Bandwidth | 25 GB/s per node bi-directional | 15 GB/s per node bi-directional |
Storage
There are four different storage systems available on ARCHER2:
- Home
- Work
- Solid State
- RDFaaS
Home
The home file systems are available on the login nodes only and are designed for the storage of critical source code and data for ARCHER2 users. They are backed-up regularly offsite for disaster recovery purposes - restoration of accidentally deleted files is not supported. There is a total of 1 PB usable space available on the home file systems.
All users have their own directory on the home file systems at:
/home/<projectID>/<subprojectID>/<userID>
For example, if your username is auser and you are in the project ta104 then your home
directory will be at:
/home/ta104/ta104/auser
Home file system and Home directory
A potential source of confusion is the distinction between the home file system which is the storage system on ARCHER2 used for critical data and your home directory which is a Linux concept of the directory that you are placed into when you first login, that is stored in the
$HOMEenvironment variable and that can be accessed with thecd ~command.
You can view your home file system quota and use through SAFE. Use the Login account menu to select the account you want to see the information for. The account summary page will contain information on your home file system use and any quotas (user or project) that apply to that account. (SAFE home file system use data is updated daily so the information may not quite match the state of the system if a large change has happened recently. Quotas will be completely up to date as they are controlled by SAFE.)
Subprojects?
Some large projects may choose to split their resources into multiple subprojects. These subprojects will have identifiers prepended with the main project ID. For example, the
rsesubgroup of theta104project would have the IDta104-rse. If the main project has allocated storage quotas to the subproject the directories for this storage will be found at, for example:/home/ta104/ta104-rse/auserYour Linux home directory will generally not be changed when you are made a member of a subproject so you must change directories manually (or change the ownership of files) to make use of this different storage quota allocation.
Work
The work file systems, which are available on the login, compute and data analysis nodes, are designed for high performance parallel access and are the primary location that jobs running on the compute nodes will read data from and write data to. They are based on the Lustre parallel file system technology. The work file systems are not backed up in any way. There is a total of 14.5 PB usable space available on the work file systems.
All users have their own directory on the work file systems at:
/work/<projectID>/<subprojectID>/<userID>
For example, if your username is auser and you are in the project ta104 then your main home
directory will be at:
/work/ta104/ta104/auser
Jobs can’t see your data?
In this course we’ll be using the data visualisation nodes in the
serialpartition and these have access to both the home and work file systems. If you are using the compute nodes in thestandardpartition for parallel work, you will need to remember that everything needed for your job will have to be on work as home is not mounted. If your jobs are having trouble accessing your data, this is the first thing to check.
You can view your work file system use and quota through SAFE in the same way as described
for the home file system above. If you want more up to date information, you can query
the quotas and use directly on ARCHER2 itself using the lfs quota command. For example,
to query your project quota on the work file system you could use:
lfs quota -hg ta104 /work
Disk quotas for group ta104 (gid 1001):
     Filesystem    used   quota   limit   grace   files   quota   limit   grace
           /work  17.24T      0k  21.95T       - 6275076       0 10000000       -
(Remember to replace ta104 with your project code.) The used column shows how much space
the whole project is using and the limit column shows how much quota is available for the
project. You can show your own user’s use and quota with:
lfs quota -hu auser /work
Disk quotas for user auser (uid 5496):
     Filesystem    used   quota   limit   grace   files   quota   limit   grace
           /work  8.526T      0k      0k       -  764227       0       0       -
A limit of 0k here shows that no user quota is in place (but you are still bound by an overall project quota in this case.)
Solid State
The solid state storage system is available on the compute nodes and is designed for the highest read and write performance to improve performance of workloads that are I/O bound in some way. Access to solid state storage resources is controlled through the Slurm scheduling system. The solid state storage is not backed up in any way. There is a total of 1.1 PB usable space available on the solid state storage system.
Data on the solid state storage is transient so all data you require before a job starts or after a job finishes must be staged on to or off of the solid state storage. We discuss how this works in the Scheduler episode later.
RDFaaS
If you had data on the /epsrc or /general file systems on the RDF, you will be able to access
this on ARCHER2 via the RDFaaS (RDF as a Service). The directory structure is the same as on the
home and work file systems, so an RDF user named auser in the e05 project would find their data
on the RDFaaS at
/epsrc/e05/e05/auser
Data on the RDFaaS is only visible on the login nodes, so should be copied to work before use in jobs.
Sharing data with other users
Both the home and work file systems have special directories that allow you to share data with other users. There are directories that allow you to share data only with other users in the same project and directories that allow you to share data with users in other projects.
To share data with users in the same project you use the /work/ta104/ta104/shared directory
(remember to replace ta104 with your project ID) and make sure the permissions on the
directory are correctly set to allow sharing in the project:
auser@ln01:~> mkdir /work/ta104/ta104/shared/interesting-data
auser@ln01:~> cp -r modelling-output /work/ta104/ta104/shared/interesting-data/
auser@ln01:~> chmod -R g+rX,o-rwx /work/ta104/ta104/shared/interesting-data
auser@ln01:~> ls -l /work/ta104/ta104/shared
total 150372

...snip...

drwxr-s---  2 auser  z01      4096 Jul 20 12:09 interesting-data

..snip...
To share data with users in other projects, you use the /work/ta104/shared directory
(remember to replace ta104 with your project ID) and make sure the permissions on the
directory are correctly set to allow sharing with all other users:
auser@ln01:~> mkdir /work/ta104/shared/more-interesting-data
auser@ln01:~> cp -r more-modelling-output /work/ta104/shared/more-interesting-data/
auser@ln01:~> chmod -R go+rX /work/ta104/shared/more-interesting-data
auser@ln01:~> ls -l /work/ta104/ta104/shared
total 150372

...snip...

drwxr-sr-x  2 auser  z01      4096 Jul 20 12:09 more-interesting-data

...snip...
Remember, equivalent sharing directories exist on the home file system that you can use in exactly the same way.
System software
The ARCHER2 system runs the Cray Linux Environment which is based on SUSE Enterprise Linux. The service officially supports the bash shell for interactive access, shell scripting and job submission scripts. The scheduling software is Slurm.
As well as the hardware and system software, HPE Cray supply the Cray Programming Environment which contains:
| Compilers | GCC, Cray Compilers (CCE), AMD Compilers (AOCC) |
| Parallel libraries | Cray MPI (MPICH2-based), OpenSHMEM, Global Arrays |
| Scientific and numerical libraries | BLAS/LAPACK/BLACS/ScaLAPACK (Cray LibSci, AMD AOCL), FFTW3, HDF5, NetCDF |
| Debugging and profiling tools | gdb4hpc, valgrind4hpc, CrayPAT + others |
| Optimised Python 3 environment | numpy, scipy, mpi4py, dask |
| Optimised R environment | standard packages (including “parallel”) |
The largest differences from ARCHER are:
- Addition of optimised Python 3 and R environments
- Absence of Intel compilers
On top of the Cray-provided software, the EPCC ARCHER2 CSE service have installed a wide range of modelling and simulation software, additional scientific and numeric libraries, data analysis tools and other useful software. Some examples of the software installed are:
| Research area | Software |
|---|---|
| Materials and molecular modelling | CASTEP, ChemShell, CP2K, Elk, LAMMPS, NWChem, ONETEP, Quantum Espresso, VASP |
| Engineering | Code_Saturne, FEniCS, OpenFOAM |
| Biomolecular modelling | GROMACS, NAMD |
| Earth system modelling | MITgcm, Met Office UM, Met Office LFRic, NEMO |
| Scientific libraries | ARPACK, Boost, Eigen, ELPA, GSL, HYPRE, METIS, MUMPS, ParaFEM, ParMETIS, PETSc, Scotch, SLEPC, SUNDIALS, Zoltan |
| Software tools | CDO, CGNS, NCL, NCO, Paraview, PLUMED, PyTorch, Tensorflow, VMD, VTST |
Licensed software
For licensed software installed on ARCHER2, users are expected to bring their own licences to the service with them. The ARCHER2 service does not provide software licences for use by users. Access to licensed software is available via three different mechanisms:
- Access control groups - for software that does not support a licence server
- Local licence server - for software that requires a licence server running on the ARCHER2 system
- Remote licence server - to allow software to call out to a publicly-accessible licence server
More information on the software available on ARCHER2 can be found in the ARCHER2 Documentation.
ARCHER2 also supports the use of Singularity containers for single-node and multi-node jobs.
Key Points
ARCHER2 consists of high performance login nodes, compute nodes, storage systems and interconnect.
There is a wide range of software available on ARCHER2.
The system is based on standard Linux with command line access.
Preparing Python for data analysis on ARCHER2
Overview
Teaching: 30 min
Exercises: 0 minQuestions
How do I access Python on ARCHER2?
What extra setup do I need to do to use Python for data analysis?
Objectives
Understand how to enable and customise Python on ARCHER2.
Add the extra packages we need for data analysis.
Accessing and using the Cray Python installation
When you log in to ARCHER2 in a new SSH session, Python will be available immediately on the command line. However, this is really just a fairly bare-bones installation that the operating system provides, and we would not recommend making use of it.
HPE, the ARCHER2 vendor, provide a separate installation of ‘Cray Python’ which includes Python 3 and several useful numerical and scientific packages. If you’ve used them before, you might think this is like having access to an Anaconda Python installation, which also comes with lots of useful packages. The Cray Python installation is actually a bit different: it includes more packages than Miniconda, but not as many as Anaconda. The most important point to note, though, is that the software bundled into Cray Python has been optimised for the ARCHER2 software and hardware, meaning it is able to use the high performance numerical and communication libraries on the system.
Cray Python is accessible via the modules system. After logging in, run the following command:
auser@ln01:~> module load cray-python
If you choose to start the Python interpreter, you will see that it is indeed a Cray build of Python 3 which runs:
auser@ln01:~> python
Python 3.8.5 (default, Aug 24 2020, 19:11:09)
[GCC 9.3.0 20200312 (Cray Inc.)] on linux
Type "help", "copyright", "credits" or "license" for more information.
>>>
Once your cursor is flashing at the >>> prompt, remember you can type Ctrl-D
or quit() to exit. The version of Python shown above is correct the time of
writing, but with software upgrades to ARCHER2 this may change.
Python 2 or 3?
Python 2 is no longer supported on ARCHER2. Once the
cray-pythonmodule has been loaded, both thepythonandpython3commands will start Python 3.
At this point you can go ahead and use Python. If you were to use NumPy or mpi4py, you would be using the versions of those packages which have been optimised for ARCHER2. However, we need to take things a bit further, because we specifically want to use pandas, matplotlib and plotnine, which are not installed–so we have to do this ourselves.
What is pip?
Modern Python installations are designed to be flexible, allowing you to add
extra packages as you require them. For that reason, several tools are available
which make managing packages very simple, automating their download and
installation from the Internet, installing any necessary dependencies to use
them, upgrading to new versions, and, if necessary, their uninstallation. If you
use a Linux distribution with a package manager like apt or pacman, or if
you use brew on macOS, this will probably look quite familiar to you. Almost
all modern Python distributions come with the ‘pip’ package manager.
Pip is run on the command line with pip. Let’s run the pip list command on
ARCHER2 once the cray-python module has been loaded in order to list the
packages that are currently installed.
auser@ln01:~> pip list
Package            Version
------------------ -------
atomicwrites       1.3.0
attrs              19.3.0
Cython             0.29.15
dask               2.13.0
fsspec             0.7.4
importlib-metadata 1.5.0
locket             0.2.0
more-itertools     8.2.0
mpi4py             3.0.3
nose               1.3.7
numpy              1.18.2
packaging          20.1
pandas             1.0.5
partd              1.1.0
pip                20.1.1
pluggy             0.13.1
py                 1.8.1
pyparsing          2.4.6
pytest             5.3.5
python-dateutil    2.8.1
pytz               2020.1
scipy              1.4.1
setuptools         47.1.0
setuptools-scm     3.4.3
six                1.14.0
toolz              0.10.0
wcwidth            0.1.8
zipp               2.2.0
There are a few other commands worth remembering. Some of these need an extra bit of flavour to use on ARCHER2, so we’ll look at them in the next section. However, because these are worth bearing in mind, they are:
pip install <package>which is used to install<package>, for examplepip install pandas. This will also install any other packages which are needed in order for<package>to run correctly.pip uninstall <package>which will, as you’ve probably guessed, uninstall<package>, for examplepip uninstall pandas.pip install --upgrade <package>which will updatepackageto any available newer versions. You should generally runpip updatefirst and thenpip upgrade.pip show <package>to get some brief information on<package>, including its dependencies, for examplepip info pandas.pip helpfor a list of commands available. You can get more information on a particular command by adding the command afterhelp, for examplepip help install.
The packages installed by pip are downloaded from the Python Package Index (PyPI). You can go to the website here to search for more information on packages you might be interested in.
Installing extra packages in user-space
If using pip on your own machine, you can do things like update pip itself. When
using it on ARCHER2, you might even see it produce a message letting you know it
can be updated. However, any updates to ARCHER2 or the packages provided in the
base installation, like numpy and mpi4py, cannot be upgraded in-place as
these are what we call ‘central installations’, installations which are
available for use by everyone on the system. As such, only users with elevated
privileges can modify Cray Python and the packages it includes, and we would
only expect them to be updated as part of a new software release from HPE. This
makes sense on a multi-user system like ARCHER2; imagine if you were working
with it, and then another user upgraded a package and caused your script to
break!
Using a newer version of Python
Software releases from HPE come in the form of a new version of the CPE (Cray Programming Environment). These are actually available on the system now, and you can see them if you run
module avail cpeAmong the output you should see that
cpe/21.04,cpe/21.09andcpe/22.04are available. The first of these is the default CPE version loaded at login, so when you runmodule load cray-pythonyou are getting the version of Cray Python that was packaged in this release. You can load newer versions of Python by loading the module for a newer CPE release. For example, after runningmodule load cpe/22.04, Python is version 3.9.7.
At this point it might look like the Python installation is, to use a Pythonic term, immutable, but this isn’t entirely the case. The files making up the central installation can’t be changed, but we can add to the installation with up extra packages which will go into our own user directories where we do have sufficient permissions. This is called a user-space installation.
This just needs a small change to the pip install command. To install a package
we would now do:
auser@ln01:~> pip install --user <package>
The new --user option tells pip to download and install <package> not into
the directories where Python is installed but into our own directories. By
default, this means into a directory called .local inside our home directory,
i.e. $HOME/.local. Remember that our ARCHER2 project on this course is
called ta104, so if your username is auser you would find that that
this pip user-space installation would place the new files and directories in
/home/ta104/ta104/auser/.local.
This is all good, but there’s a final and critical consideration when using
ARCHER2 in this way. As we saw in the previous episode, the home file system,
where /home resides, is not mounted on the compute nodes. On the other hand,
the high-performance work file system is. That means that if we want to use any
custom-installed Python packages when running on the compute nodes, we will need
to change the installation location to somewhere on /work instead.
An obvious thing to do is simply to install our custom packages into our own
work directories. We can do that with the three commands below, setting the
environment variables that pip uses to see where it should install to and also
making sure that Python and the shell will be able to find those packages once
installed. When doing this, you should of course change auser to your own
ARCHER2 username.
auser@ln01:~> export PYTHONUSERBASE=/work/ta104/ta104/auser/.local
auser@ln01:~> export PATH=$PYTHONUSERBASE/bin:$PATH
auser@ln01:~> export PYTHONPATH=$PYTHONUSERBASE/lib/python3.8/site-packages:$PYTHONPATH
At this point you can go ahead and use pip install --user <package> to install
to the non-default location. In the next section we’ll go through the commands
we need to perform the necessary setup.
Setting the environment up again
If you log out and in again after doing this set up, you’ll find that you need to run these three
exportcommands again. Asking pip to install to the non-default location doesn’t automatically carry over between shells. To make things a bit easier, you can open up the.bashrcfile in your home directory and add the commands. This script runs in new shells when they start up, including when you log in. If you’re ever unsure of the value of an environment variable or whether it’s been set or not, you can simply print it to screen withecho, for example,echo $PYTHONPATH.
Python virtual environments
What we’ve done here is about the simplest and fastest way to get the extra packages we need installed. If you want to, though, you may be interested in instead using virtual environments to manage different sets of installed packages depending on your requirements. You can read about how to do this in the ARCHER2 documentation.
Adding the extra packages for this course
Finally, let’s put all of the above together and actually install the packages we need to run the exercises from earlier on ARCHER2.
Starting from logging in, so we have a clean environment, we’ll firstly load Cray Python into the environment.
auser@ln01:~> module load cray-python
Then we’ll set the environment variables to install into the work file system, just as above.
auser@ln01:~> export PYTHONUSERBASE=/work/ta104/ta104/auser/.local
auser@ln01:~> export PATH=$PYTHONUSERBASE/bin:$PATH
auser@ln01:~> export PYTHONPATH=$PYTHONUSERBASE/lib/python3.8/site-packages:$PYTHONPATH
Finally, we’ll install the necessary packages for the exercises. You can check
what’s already been installed with pip list. You’ll see that pandas is already
there, but we might need both matplotlib and plotnine, so we’ll install those.
auser@ln01:~> pip install --user matplotlib plotnine
You’ll see pip doing some work as it downloads the packages and probably a good few dependencies from the Internet to install them in your work directory. Once done, pip should inform you that it has successfully installed these two packages and any dependencies.
At this point we’re almost ready to run our exercises on ARCHER2. In the next episode, we’ll look at how to submit a job to the ARCHER2 backend to do so.
Key Points
The
cray-pythonmodule provides an enhanced Python installation on ARCHER2.Many numerical packages are already provided in this installation.
Further packages can be added to it using
pip.
Lunch
Overview
Teaching: min
Exercises: minQuestions
Objectives
Key Points
Running jobs on the ARCHER2 data analysis nodes
Overview
Teaching: 30 min
Exercises: 0 minQuestions
What is a scheduler?
What is a job?
How do I run jobs?
Objectives
Write a correct job script.
Submit a job to the queue and retrieve the results.
The Slurm batch system
We’ve spoken about the layout of ARCHER2. Its structure is broadly typical for a cluster: there is a frontend, the login nodes, which we connect to via SSH and where we prepare data and work, and then the backend, made up of the compute nodes which will actually do the work. So far though we’ve only interacted with the login nodes.
Access to the backend is governed by a ‘scheduler’. Again, this is typical for a cluster. A scheduler is a piece of software running in the background. Users submit jobs to it, which are requests for resources to be used (typically a number of CPU cores or nodes and perhaps an amount of memory) over a certain period of time, and the scheduler determines when to reserve those resources for that job. This may sound simple, but there can be many hundreds or thousands of jobs either running or waiting to run at any given time, and the scheduler must determine when to run what as fairly as possible for everyone.
Slurm is the name of the scheduler used on ARCHER2. If you’ve used a cluster before, you might be familiar with it or with alternatives like PBS or SGE. They are all used in a similar manner, but the commands used to interact with each of these schedulers differ.
Try running the squeue command now. This will produce a list of all the jobs
in the system. It will probably be quite long.
auser@ln01:~> squeue
If you want to see what jobs auser has in the system, you can use
auser@ln01:~> squeue -u auser
You can use this to look at your own jobs, but it can be quicker and easier to run
auser@ln01:~> squeue --me
Of course, we haven’t actually run any jobs yet, so you’ll see an empty list if
you check yourself with squeue.
For any jobs listed, you’ll see its ID, its name, the length of time it’s been
running and its status. Most jobs will have the status R, meaning ‘running’,
or PD, meaning ‘pending’. Running jobs will also list the names of the nodes
they’re using, while pending jobs will list the reason they haven’t run yet.
Slurm tries to be fair when determining when the pending jobs should be started. If you’re interested it uses what is called a backfill algorithm, but the gist of it is that it schedules the largest pending jobs first, taking into account how many resources they each need and for how long, and then it starts fitting smaller jobs into the gaps between the big jobs.
You might still be wondering ‘what is a job, though?’ At the highest level, a job is a set of resources, CPU cores and memory, on the backend of the cluster that has been reserved for you and your work. In most cases, users are charged for their jobs from a budget they have access to. Resources on ARCHER2 are in units of ‘CU’ where 1 CU is equal to one node hour. One node is the use of one compute node for one hour, so using two nodes for four hours would cost 8 CU, for example. If a user’s budget runs out, they can no longer run jobs from it. Most jobs do cost CUs to run, though, as we’ll see below, we’ll be using the special data analysis or serial nodes which are free to use.
Job scripts
Resources by themselves don’t do anything. What we call an interactive job allows you, the user, to directly work on the backend in a shell. On ARCHER2, you might for example submit a job asking for four nodes. When the job starts, you would move onto the first node in the job and work directly on it.
Most of the time, though, people will submit job scripts to the scheduler instead. These are simply shell scripts, with some extra syntax at the beginning saying what resources are needed, that go in order through the steps needed to complete the work.
How to write a text file on ARCHER2
You can write text files locally on your own machine and copy it to ARCHER2, but most people will edit them directly on the system using a text editor.
emacs,vi/vimandnanoare all available. If you aren’t experienced with any of these,nanois quite simple and the fastest to learn.
The job script that we will use in this course looks like the following:
#!/bin/bash

# Slurm job options. Set name and max time.
#SBATCH --job-name=python_job
#SBATCH --time=0:20:0
#SBATCH --ntasks=1

# Run with budget ta104 on the serial nodes.
#SBATCH --partition=serial
#SBATCH --qos=serial
#SBATCH --account=ta104

# Define memory required for this jobs. By default, you would
# get just under 2 GB, but you can ask for up to 125 GB.
#SBATCH --mem=2G

# Set the number of threads to 1
#   This prevents any threaded system libraries from automatically
#   using threading.
export OMP_NUM_THREADS=1

# Make the Cray Python installation available.
module load cray-python

# Make available user-installed Python packages installed in work.
export PYTHONUSERBASE=${HOME/home/work}/.local
export PATH=$PYTHONUSERBASE/bin:$PATH
export PYTHONPATH=$PYTHONUSERBASE/lib/python3.8/site-packages:$PYTHONPATH

# Run my_analysis_script.py through Python.
python my_analysis_script.py
There’s quite a lot to take in here, so we’ll go through it piece-by-piece.
The first line is a shebang. Just as Python scripts often start with
#!/usr/bin/python, #!/usr/bin/env python3 or another similar command that
means the script is to be run through the Python interpreter, the shebang in
this case says that the script is to be run through bash.
Several more lines beginning with # follow. Some are comments, just there to
help us understand what’s happening. Very important though are the lines
beginning with #SBATCH. These are Slurm directives which provide information
about the resources we would like for this job.
#SBATCH --job-name=python_jobsets the name of the job that we’ll see if we runsqueue. You can change this to whatever you think will help you identify your job.#SBATCH --time=0:20:0says that the job can run for, at most, 20 minutes. If the script finishes before then, the job will end cleanly. If it’s still going at 20 minutes, Slurm will shut it down and the resources will be released for other jobs.#SBATCH --ntasks=1says that we want to run a single task on one processor core. For us just now, this doesn’t matter too much, but ARCHER2 is capable of running massively parallel jobs with hundreds of thousands of tasks working in tandem.#SBATCH --partition=serialand#SBATCH --qos=serialare two commands we use together to specify that we want this job to run on one of the data analysis nodes. These are a bit different from the standard ARCHER2 compute nodes. They have twice as much memory and are intended to allow users to run many different serial (meaning not parallel) jobs on them at the same time.#SBATCH --account=ta104tells Slurm which budget to charge the resources used by the job to. You can think of the word ‘account’ here meaning something more like a bank account rather than a user account. For us, the value is the project name. As we’ll be running on the data analysis nodes, theta104budget won’t actually be charged.#SBATCH --mem=2Gtells Slurm that of the 512 GB memory on an individual data analysis node, we would like to reserve 2 GB for our job. You can request up to 125 GB if necessary.
Because these lines begin with the bash comment character #, bash will ignore
them. But, as we’ll see, we run the script through a special command which will
pick these lines up and use them when entering the job into the scheduler.
So far, everything we’ve seen has been about setting up the job and requesting
the resources we would like to use for it. But what about the actual work? We
want a Python script to run and do something useful for us. So, after all the
#SBATCH lines are some uncommented lines of commands to actually be run via
bash on the data analysis node when the job begins. Let’s go over those now.
Firstly, there’s an export command setting the variable OMP_NUM_THREADS to
have the value of 1. This isn’t too important for us here, but its purpose is
to make sure that anything in the background that might use OpenMP threading for
parallelisation restricts itself to one thread only. This makes sense, as we’ve
only got one CPU core to use from the ntasks option we set.
Next, we load a module and set some environment variables. These should be
familiar to you from the previous lesson: we’re loading Cray Python and making
sure that it will be able to see and use the Python packages we installed into
our work directory. These commands make an important point: the environment
within the job is new and separate from the environment we’re using in our
interactive shell session. If there are any steps you need to go through to
enable your code to start and run correctly, you should put them into your job
script. If we hadn’t run module load cray-python, the system Python
installation would be used instead; if we hadn’t set these three environment
variables, Python would have no idea where to find matplotlib or plotnine.
At this point there is only one thing left to do, and that’s to run the Python
script itself, so we start Python and tell it to run my_analysis_script.py.
Running and controlling a job
The next step is to actually run a job. Let’s take our imaginary job script
above and save it in a file somewhere in our work directories. Its name doesn’t
really matter: the most important thing is that it makes sense to you. One
choice that can help you is to give the files a .slurm extension, so you can
at least pick out which files are job scripts. From there you might choose to
use run.slurm, submit.slurm, or perhaps you would like to include some
information about the particular job in the name – for example,
submit-T100.slurm, submit-T200.slurm and so on if the different jobs vary
some parameter T.
With the script saved to file, you can submit the job to the queue by running
the sbatch command as follows:
auser@ln01:/work/ta104/ta104/auser/jobdir> sbatch submit.slurm
Submitted batch job 3327070
Problems submitting the job
If Slurm thinks that some of the
#SBATCHoptions you set in your script don’t make sense, it might refuse to accept your job and give an error message. Check with the instructor or one of the helpers for assistance, providing the error you receive and your full job script so they can help you fix the problem.
Once your job has been submitted, you can check the status of your job in the queue:
auser@ln01:/work/ta104/ta104/auser/jobdir> squeue --me
             JOBID PARTITION        NAME    USER ST       TIME  NODES NODELIST(REASON)
           3327087    serial  python-job   auser  R       0:01      1 dvn01
In the output above, the job has the R status, as it started running almost
straight away. If the queue’s a bit busier when you submit, you might see it
pending with the PD status. In this case it might take a while for the job
to start running, but as long as you kept the time option in your script to
only a few tens of minutes or less it shouldn’t be long.
Sometimes you realise that you’ve made a mistake in your script, or perhaps you
don’t need a job to run any more for some other reason. This could be while it’s
running or while it’s still pending. In either case, you can cancel it with the
scancel command, giving the ID of the job you want to cancel:
auser@ln01:/work/ta104/ta104/auser/jobdir> scancel 3327087
The only people who can cancel your jobs are you yourself and the system administrators, and the latter only in extremely unusual circumstances. If there were a need to cancel your jobs, in almost all cases the ARCHER2 service desk would contact you directly and ask if you are able to do so.
Any output to STDOUT and STDERR – that is, output and error messages that
would normally appear in your terminal if you ran the script in an interactive
session – will instead be written to a file called slurm-<jobid>.out. In the
example job submission here, that means you would expect to find a file called
slurm-3327087.out in the same directory as the job script. You can check this
file while the job is running to make sure that it’s working as you can expect,
and after the job has run it can help you determine whether it ended as you
expected it should.
cat will dump the entire contents of a text file to the terminal’s output:
auser@ln01:/work/ta104/ta104/auser/jobdir> cat slurm-3327087.out
less allows you to scroll and search through a file:
auser@ln01:/work/ta104/ta104/auser/jobdir> less slurm-3327087.out
While a set of text is open with less, press q to quit back to the prompt.
The up and down arrow keys move you line by line through the text. u and d
will move you up and down a half-page at a time. g returns to the text’s
start, and G to the end. Finally, typing / followed by some text, then
pressing the return key, will search for that text. You can move forwards and
backwards between found instances of that text with n and N.
If your job ran correctly to completion, you should find your output just where you would expect to find it if you’d run the Python script interactively.
Summary
Putting everything together, most people will work with Python on ARCHER2 as follows:
- Set up Python script, get input data in place.
- Write job script to run Python script on that data.
- Submit script as job to the queue.
- Wait for job to complete.
- Download output to local system or use as input for a second round of analysis.
Key Points
Access to resources on a cluster is often governed by a scheduler like Slurm.
Batch systems try to provide fair access to resources to users on the system.
A job is run automatically once it is run on available resources.
What now?
Overview
Teaching: 5 min
Exercises: 160 minQuestions
Can I manage to use ARCHER2 to run one of the exercises?
Objectives
Run an exercise or Python script of your own on ARCHER2.
Now you know enough about ARCHER2 to explore how to use it for your work or to understand what its potential benefits are you. You may also have ideas around where the barriers and difficulties may lie and have further questions on how you can start using and/or trying ARCHER2 for your work.
This session is designed to give you the opportunity to explore these questions and issues. We recommend that you try to run one of the exercises from the first part of the course on ARCHER2, or possibly even try to use a data analysis script of your own on the system.
The instructors and helpers on the course will be on hand to help and to answer any questions you might have.
Outside this course, you can always seek help on using ARCHER2 by getting in touch with the service desk at support@archer2.ac.uk.
Running an exercise on ARCHER2
At this point you should be able to log in to ARCHER2, install up your custom Python packages, and run jobs.
Remember that you will need to use a job script similar to the one we looked at
in the previous lesson. Feel free to copy that script and save it into a
directory you create in your ARCHER2 work directories, along with a Python
script to do some useful work and any input data required. Make any changes you
feel are necessary to that job script before submitting it to Slurm with
sbatch. Keep track of it in the scheduler using squeue and by checking the
slurm-<jobid>.out file, and if necessary cancel it with scancel.
Once a job has completed successfully, you can transfer any output to your
machine using a tool like scp or rsync. If you are connecting with MobaXterm
from Windows, you should be able to use the client’s built-in SFTP file transfer
using the pane on the left hand side of the GUI.
If you’d prefer to check text output on ARCHER2 itself, remember that you can
use the command line tools cat or more or less, or else open the files
directly with an editor like vim. If you log in to ARCHER2 with X11 forwarding
enabled (using either the -X or -Y options to ssh, or enabling it as an
option in MobaXterm), you can also use ImageMagick’s display tool to view
images after you’ve loaded the module:
auser@ln01:~> module load imagemagick
auser@ln01:~> display image.jpg
Bear in mind that none of ARCHER2’s file systems are intended for long term
storage of data and you should consider anything kept in /work as being at
risk. To keep any data you generate safe, you should transfer it off-site and
keep backups.
With everything now covered, you can try using this time to try logging in to the ARCHER2 supercomputer, setting up Python, and running a job!
Key Points
Perform large tasks on ARCHER2 by running jobs on the back end.
Any files you generate should be transferred to your own local storage and backed up.